- Tile tutorial
- 2094 views
- 0 comments

Machine translation
A heavy object falling on a tiled floor is the main cause of the appearance of a crack. And since this is unsightly and irreparable, it is necessary to think to replace the damaged tile. Of course, nothing prevents you from entrusting the task to a professional tiler. But you can also change your broken tile yourself to minimize your expenses.
Gather all necessary materials
To begin, you must gather all the materials and tools necessary to change the damaged tile. Make sure you have to at your disposal: tile adhesive, mortar joint, tiler squeegee, a cloth, a brush, a sponge, household gloves and eye protection.
You will also need hydrochloric acid, cement veil special product, a scraper, a notched spatula, chisels, a grinder, spacers, ;a rubber mallet and a hammer.
Break the damaged tile
Once all the tools have been assembled, remove the joints around the damaged tile and break it. Then insert the chisel into a crack, in the middle of the tile, and tilt it to be able to hit it with a hammer in order to make the pieces of tile take off and lift.
During the operation, make sure not to touch the other tiles located just outside the alignment side broken tile. In fact, the ideal is to always start from the center outwards to effectively remove the chipped tile.
Prepare the floor and apply the glue for the new tile
To continue, prepare the ground that will receive the new tile. Use to again the chisel to remove the adhesive mortar residues and clean the surface to obtain a clean, dry, flat, flat and smooth floor.
The next step is to; apply the glue for the new tile. Then, you must position the latter at; glued area. Try to respect the space provided for the tile joints by placing spacers and press enough to push the tile in.
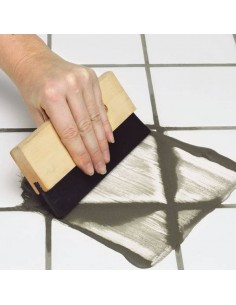
Make the tile joints and remove the veil of cement
Before making the tile joints, you must remove the adhesive residues present on the surface. Apply the mortar to the joints of the new tile and smooth the joints. Then wash off any traces of mortar on the tiles and leave to dry.
Finally, the last step is to; remove the veil of cement that appears on the dry joints. These white marks can be treated with different products including: a special cement veil product or hydrochloric acid.
Related products


Comments (0)